Best

Micro Coaxial Cable factory

How to Test Coaxial Cable for Signal Integrity

Coaxial cables are the backbone of many communication systems, from home internet setups to industrial networking and broadcasting. Ensuring their signal integrity is crucial for maintaining reliable data transmission, minimizing interference, and avoiding costly downtime. But how do you effectively test a coaxial cable to confirm it’s performing at its best? In this guide, we’ll walk through the key steps, tools, and techniques to test coaxial cable signal integrity, helping you diagnose issues and keep your systems running smoothly.

Why Signal Integrity Matters for Coaxial Cables

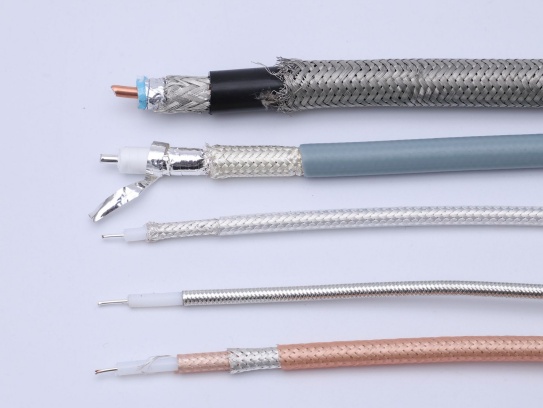
Before diving into testing methods, it’s important to understand why signal integrity is critical. Coaxial cables are designed to carry high-frequency signals with minimal loss or interference, thanks to their layered structure: a central conductor, insulating dielectric, metallic shield, and outer jacket. Over time, however, factors like physical damage, corrosion, poor connections, or aging can degrade performance.

Signs of poor signal integrity include:

  • Slow data transfer speeds
  • Dropouts in audio, video, or internet connections
  • Static, noise, or distortion in signals
  • Complete signal loss

By testing for signal integrity, you can catch these issues early, prevent system failures, and ensure your coaxial cables meet the required performance standards for their application (e.g., 5G networks, CCTV systems, or satellite TV).

Pre-Test Preparation: Inspect the Cable Physically

Before using specialized tools, start with a visual and physical inspection. Many signal integrity issues stem from obvious damage that’s easy to spot with the naked eye. Here’s what to check:

  1. Outer Jacket Damage: Look for cuts, cracks, or abrasions. A damaged jacket exposes the shield to moisture, dirt, and corrosion, which can degrade signal quality.
  2. Bends and Kinks: Sharp bends or kinks can crush the dielectric or break the central conductor, causing signal loss. Coaxial cables have a minimum bend radius (specified by the manufacturer) that should never be exceeded.
  3. Connectors: Check for loose, bent, or corroded connectors. Even minor damage to connectors (e.g., F-connectors, BNC, or N-type) can create impedance mismatches, leading to signal reflections.
  4. Shield Continuity: Ensure the metallic shield (braided or solid) is intact. A broken shield allows external interference (EMI/RFI) to penetrate and corrupt the signal.
  5. Moisture or Corrosion: Look for signs of water ingress (e.g., discoloration or swelling) or rust on connectors/shields, which is common in outdoor or humid environments.

If you spot any of these issues, address them first (e.g., replace damaged connectors or trim kinked sections) before proceeding to electronic testing.

Key Testing Tools for Coaxial Cable Signal Integrity

To accurately measure signal integrity, you’ll need the right tools. The choice depends on the complexity of your system and the issues you suspect. Here are the most common tools:

1. Multimeter (for Continuity and Resistance Tests)

A basic multimeter is essential for checking electrical continuity and resistance, which indicate if the conductor and shield are intact.

2. Cable Tester (Coaxial-Specific)

Handheld coaxial cable testers (e.g., Klein Tools VDV501-851 or Ideal Networks LanTEK IV) are designed to check for shorts, opens, and impedance mismatches quickly. They often include LED lights or displays to indicate pass/fail results.

3. Time-Domain Reflectometer (TDR)

A TDR sends a signal pulse down the cable and measures reflections. It can pinpoint the location of faults (e.g., breaks, kinks, or mismatched connectors) with high accuracy, making it ideal for long cables.

4. Network Analyzer

For advanced testing, a vector network analyzer (VNA) measures insertion loss (signal loss over distance), return loss (signal reflections), and impedance across a range of frequencies. It’s used in professional settings (e.g., telecom or aerospace) to verify performance against industry standards (e.g., RG-6, RG-59, or LMR-400 specifications).

5. Signal Level Meter (SLM)

Common in TV and satellite installations, an SLM measures signal strength and quality (e.g., dBmV) to ensure it falls within the acceptable range for reliable reception.

Step-by-Step Testing Methods

Method 1: Continuity Test (Multimeter)

A continuity test checks if the central conductor and shield are electrically continuous (no breaks). Here’s how to do it:

  1. Disconnect the cable: Ensure the cable is disconnected from all devices to avoid damaging equipment or getting false readings.
  2. Set the multimeter: Switch to the continuity mode (often marked with a sound wave or “Ω” for resistance).
  3. Test the central conductor: Touch one probe to the central pin of one connector and the other probe to the central pin of the opposite end. A beep or low resistance reading (near 0Ω) indicates continuity. No beep or high resistance means a break in the conductor.
  4. Test the shield: Repeat the process with the shield (touch one probe to the shield of one connector and the other to the shield of the opposite end). Again, a beep confirms continuity.
  5. Check for shorts: Touch one probe to the central conductor and the other to the shield at the same end. A beep or low resistance indicates a short (the conductor is touching the shield), which will severely disrupt signals.

Method 2: Impedance Testing

Coaxial cables are designed for a specific impedance (e.g., 50Ω for industrial systems, 75Ω for audio/video). An impedance mismatch (e.g., 50Ω cable connected to a 75Ω device) causes signal reflections, reducing integrity.

  • Using a multimeter: Measure resistance between the central conductor and shield at one end (cable disconnected). For a healthy cable, resistance should be very high (ideally infinite), indicating no short. For impedance-specific testing, use a coaxial impedance meter or network analyzer, which measures impedance across the cable’s operating frequency range.
  • Using a TDR: A TDR sends a pulse and graphs reflections. A flat line indicates consistent impedance; spikes show mismatches (e.g., at connectors or damaged sections).

Method 3: Signal Loss (Insertion Loss) Testing

Insertion loss measures how much signal strength is lost as it travels through the cable. Excessive loss (beyond manufacturer specs) indicates degradation.

  • Using a network analyzer: Connect the analyzer to both ends of the cable. It will measure loss in decibels (dB) across frequencies. Compare results to the cable’s datasheet (e.g., RG-6 should have ~3.5dB loss per 100ft at 1GHz).
  • Using a signal level meter (SLM): For TV/audio systems, connect a signal generator to one end of the cable and the SLM to the other. The SLM reads the signal strength at the output; subtract this from the input strength to calculate loss.

Method 4: Reflection Testing (TDR or Network Analyzer)

Reflections occur when signals hit impedance changes (e.g., breaks, kinks, or poor connectors). A TDR visualizes these reflections as spikes on a graph, showing their distance from the test point.

  1. Connect the TDR to one end of the cable.
  2. Trigger the TDR to send a pulse.
  3. Analyze the graph:
  • A clean, flat line means minimal reflections (good integrity).
  • A sharp spike indicates a fault (e.g., a break or short) at the distance marked on the TDR.
  • Gradual spikes may signal a damaged shield or dielectric.

Method 5: Interference Testing

External interference (EMI/RFI) can corrupt signals, even if the cable itself is intact. To test for interference:

  1. Use a spectrum analyzer: Connect it to the cable and scan for unwanted frequencies (e.g., from nearby power lines or motors). Spikes in the spectrum indicate interference.
  2. Check shield effectiveness: A compromised shield (e.g., a broken braid) will let interference in. Use a TDR or network analyzer to test shield continuity, or wrap the cable in a grounded metal foil and retest—if signal quality improves, the shield is faulty.

Common Issues and Troubleshooting

IssueCauseSolution
High insertion lossAging dielectric, crushed cable, or corrosionReplace damaged sections or the entire cable.
Signal reflectionsImpedance mismatch or loose connectorsUse matching connectors/equipment; tighten or replace connectors.
InterferenceBroken shield or poor groundingRepair/replace the shield; ensure proper grounding of connectors.
ShortsConductor touching shield (e.g., from kinks)Cut out damaged sections and re-terminate.
No continuityBroken conductor or shieldReplace the cable (repairs are rarely reliable for high-frequency signals).

Best Practices for Maintaining Signal Integrity

  • Handle with care: Avoid bending beyond the minimum radius or stepping on cables.
  • Use quality connectors: Poorly crimped or cheap connectors cause mismatches. Invest in professional-grade tools for termination.
  • Protect from the elements: Use weatherproof connectors for outdoor cables and avoid exposing them to moisture or extreme temperatures.
  • Test regularly: Schedule periodic tests (especially for critical systems) to catch issues before they cause failures.

Conclusion

Testing coaxial cable signal integrity is a mix of physical inspection and electronic measurement. By using tools like multimeters, TDRs, and network analyzers, you can diagnose issues like breaks, shorts, impedance mismatches, and interference—ensuring your cables deliver reliable, high-quality signals. Whether you’re a homeowner troubleshooting a TV antenna or an engineer maintaining industrial networks, following these steps will help you keep your coaxial systems in top shape.

Remember: Early detection saves time and money. Regular testing is the key to long-term signal integrity.

More Micro Coaxial Cable related Products

Flexible Micro-Coaxial Assemblies

Meta Description: Discover our premium Flexible Micro-Coaxial Assemblies—engineered for high-frequency signal integrity, durability, and versatility in aerospace, medical, telecom, and robotics applications. What Are Flexible .

More information
Micro Coaxial Cable
Micro Coaxial Cable

Micro Coaxial Cable: High-Quality Solutions for Precision Applications Micro coaxial cables are essential components in high-performance electronic applications, providing reliable signal transmission in compact and flexible designs. A.

More information
High-Speed Data Micro-Coax

IntroductionIn today’s fast-paced digital world, reliable and high-speed data transmission is critical for industries ranging from telecommunications to aerospace. Enter ​High-Speed Data Micro-Coax—a cutting-edge miniature coaxial cable e.

More information
High-Temperature Resistant Micro-Coaxial Cable

IntroductionThe ​High-Temperature Resistant Micro-Coaxial Cable is a cutting-edge connectivity solution engineered to deliver exceptional performance in extreme thermal environments. Combining precision engineering with advanced mate.

More information
Industrial Micro-Coaxial Wiring

Meta Description: Discover the advanced features and benefits of Industrial Micro-Coaxial Wiring—engineered for precision, durability, and high-speed signal transmission in industrial environments. ​What is Industrial Micro-Co.

More information
RF Micro Coaxial Cable

Meta Description: Discover premium ​RF micro coaxial cables engineered for high-frequency signal transmission in compact devices. Explore specs, applications, and benefits for telecom, medical, and aerospace industries. ​.

More information
Precision Instrument Micro-Coax

H1: Precision Instrument Micro-Coax – Engineered for Critical Signal Integrity Meta Description: Discover Precision Instrument Micro-Coax: Miniature coaxial cable solution optimized for high-frequency signal transmissio.

More information
KEL Micro Coaxial Cable

KEL’s Micro Coaxial Cable solutions are at the forefront of modern electronic connectivity, offering exceptional performance in high-speed data transmission, miniaturization, and reliability. These connectors are integral to various.

More information
LVDS Micro Coaxial Cable

In LVDS (Low Voltage Differential Signaling) display systems, Micro-coaxial Cable (also referred to as Micro Coax Cable) stands out as an optimal solution for high-resolution, high-reliability signal transmission. Designed to meet the str.

More information
I-PEX Micro Coaxial Cable

Overview of I-PEX Micro Coaxial Cable Connectors I-PEX is a global leader in micro coaxial cable solutions, specializing in high-performance IPEX micro coax connectors and micro coaxial cable assemblies. These products are designed for.

More information
Micro-Coax for HD Video

OverviewMicro-Coax for HD Video is a cutting-edge coaxial cable engineered to deliver ​uncompromised high-definition video quality across professional and industrial applications. Designed for reliability, precision, and versatility,.

More information
Micro Coaxial Cable Service