Mastering High-Frequency Signals: How to Integrate Micro Coaxial Cables into PCB Designs for Optimal Performance - Micro Coaxial Cable factory-(FRS)
Micro Coaxial Cable factory-(FRS)
INFO
Micro coaxial cables (often called “micro coax”) are essential components for transmitting high-speed digital signals, RF signals, and low-level analog signals in modern electronics where space is constrained and signal integrity is paramount. Integrating them seamlessly onto a Printed Circuit Board (PCB) requires careful planning and execution. This comprehensive guide explores the critical steps and best practices for successful micro coaxial cable integration, ensuring robust performance and enhanced reliability in your designs.
Why Use Micro Coaxial Cables on PCBs?
Before diving into how, understanding the why is crucial:
Unrivaled Signal Integrity (SI): Micro coax provides superior electromagnetic interference (EMI) shielding compared to PCB traces, especially critical for:
High-speed serial interfaces (USB 3+/4, PCIe Gen 3/4/5, HDMI 2.1+, DisplayPort, Thunderbolt)
Sensitive analog signals (medical sensors, instrumentation).
Minimal Crosstalk: The outer shield effectively isolates the inner conductor from neighboring signals.
Impedance Control: Coax cables maintain a consistent characteristic impedance (e.g., 50Ω, 75Ω) along their length, critical for minimizing reflections.
Reduced Radiation: Significantly lower EMI emissions compared to exposed differential pairs or single-ended traces at high frequencies.
Flexibility: Micro coax allows routing between stacked boards, around components, or to external connectors/devices where rigid PCB routing is impossible or impractical.
Key Considerations for Integrating Micro Coax onto PCBs
Selecting the Right Micro Coaxial Cable:
Impedance: Match the cable’s impedance (50Ω or 75Ω are standard) to your source, destination, and PCB traces.
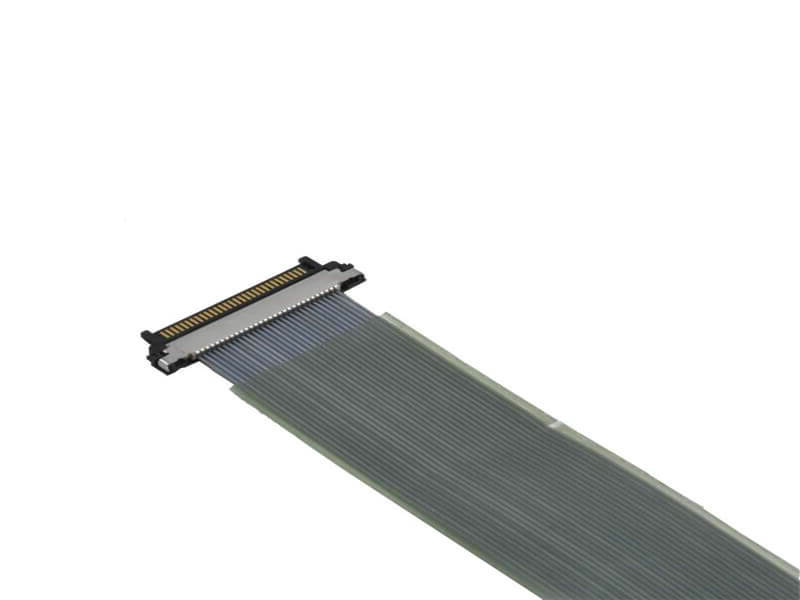
Size: Diameters range from ~0.4mm to ~2.0mm (e.g., RG-178, RG-316). Choose based on space constraints and required bend radius.
Frequency Range: Ensure the cable’s specified bandwidth exceeds your signal frequencies.
Shield Effectiveness: Look for cables with high braid or foil + braid coverage (e.g., >95%) for best EMI performance.
Flex Life: Critical for dynamic applications like robotics or foldable devices. Ensure sufficient durability.
Termination Compatibility: Verify available termination methods align with your PCB landing pad design.
PCB Stackup and Grounding Strategy:
Solid Reference Planes: Ensure continuous ground planes adjacent to the layers where coax connects. The shield must have a low-impedance path to ground.
Impedance Control: Design the trace leading from the micro coax termination point to the IC/connector to match the cable’s impedance. Use a field solver for accuracy.
Ground Vias: Strategically place numerous ground vias near the termination points to provide an ultra-low inductance return path for the shield currents and prevent ground loops. Use stitching vias around the connector footprint.
Termination Method: Precision is Key:
Solder Landing Pads: Design dedicated pads on the PCB surface layer.
Center Conductor Pad: Size for the inner pin/terminal; connect to the controlled impedance signal trace.
Shield Ground Pads: Design large, robust pads encircling the center pad (but electrically isolated) with thermal relief connections to the internal ground plane(s) only through the dense array of grounding vias.
Clearance: Maintain precise clearance between center pad and shield pads based on cable spec and soldering process tolerance. IPC standards are your friend.
Choice of Connector / Solder Method:
Board Mount Coaxial Connectors: (e.g., u.FL, SMP, MMCX, GPPO). Provide mechanical strain relief and precise mating. Design footprint exactly to manufacturer specs.
Direct Cable Soldering: Precise hand or automated soldering of the coax center conductor and shield wires/braid directly to the PCB pads. Requires skilled assembly and robust strain relief.
Surface Mount (SMT) Coax Connectors: Offer excellent repeatability for high-volume production.
Strain Relief: Non-Negotiable Reliability
Secure Attachment: Micro coax connections are fragile. Implement robust strain relief immediately adjacent to the solder joints.
Common Methods:
Epoxy: Apply a small amount of adhesive (compatible with the cable jacket) to bond the cable jacket to the PCB surface.
Cable Ties/Clips: Use dedicated surface-mount tie-down points or clips.
Strain Relief Features: Include hooks or posts molded into connectors.
Avoid Stress: Route the cable so bends start after the strain relief point, minimizing stress directly on the solder joints.
Routing and Placement:
Minimize Length: Keep coax runs as short as possible to minimize loss.
Bend Radius: Strictly adhere to the cable’s minimum bend radius spec, especially near termination points. Avoid sharp kinks.
Separation: Keep micro coax cables away from noise sources (switching regulators, clocks, digital buses) and sensitive circuitry when possible.
Shielding: Route cables away from cutouts or gaps in reference planes that compromise their shielding effectiveness. If cables cross plane splits, ensure the shield has a good ground path on both sides.
Service Loops (If Applicable): Leave a small service loop for future access or rework, but manage slack carefully.
Assembly Process: Critical for Success
Documentation: Provide clear assembly drawings and instructions specifying termination points, orientation, soldering method, and strain relief application.
Handling: Stress proper handling procedures to prevent cable damage during assembly.
Soldering: Skilled technicians are essential. Avoid excessive heat that damages cable dielectric or melts the jacket. Use appropriate flux and solder.
Inspection: Mandatory visual inspection (microscope recommended) and electrical testing (TDR for impedance checks, continuity, isolation tests) post-assembly.
Design Comparison Table: Micro Coax Integration
Design Aspect
Critical Consideration
Potential Pitfall
Impedance Matching
Match cable and trace impedance; use field solvers
Reflections, signal distortion, SI failures
Grounding
Low-impedance shield path; dense via stitching
Ground loops, ineffective shielding, EMI
Termination
Precision pad design; shielded solder joints
Weak connections; shorts; signal leakage
Strain Relief
Secure attachment at solder points
Broken connections from vibration/use
Bend Management
Maintain min. cable bend radius
Signal degradation; cable damage
Assembly
Skilled soldering; inspection protocols
Cold joints; overheating; connection failures
Advantages & Challenges
Advantages: Superior SI/EMI performance, consistent impedance, design flexibility, reduced crosstalk.
Integrating micro coaxial cables into PCB designs is a powerful strategy for overcoming the signal integrity challenges presented by high-speed and high-frequency applications. Success hinges on meticulous attention to detail: selecting the right cable, designing precise termination structures with exceptional grounding, implementing robust strain relief, carefully planning routing paths, and ensuring a highly controlled assembly process.
By mastering these techniques, PCB designers can leverage the benefits of micro coax to create compact, reliable, and high-performance electronic products that meet the demanding requirements of modern wireless communication, high-speed computing, medical devices, and aerospace systems. Carefully integrating these cables elevates your design from functional to exceptional in the realm of signal fidelity.
Ready to Elevate Your High-Speed PCB Designs? Consult with our signal integrity experts to ensure flawless micro coax integration in your next project!
Coaxial cable assemblies are essential components in countless electronic and communication systems, serving as the backbone for transmitting high-frequency signals with minimal interference. From consumer electronics to industrial mach...
Coaxial cables have long been a cornerstone in signal transmission systems, but their performance at low frequencies (typically below 1 MHz) often faces unique challenges that can compromise signal integrity. In applications such as ind...
The demand for increasingly smaller, higher-performance electronic devices continues to surge. From cutting-edge medical implants to ultra-compact consumer gadgets and sophisticated military/aerospace systems, space is at a premium. Thi...
Meta Description: Discover the critical phase stability requirements for aerospace micro-coaxial assemblies, including design considerations, testing methods, and industry best practices to ensure reliability in extreme environment...
In the realm of modern communication, coaxial cables stand as vital components, facilitating the transmission of high-frequency signals across various sectors such as telecommunications, broadcasting, and data centers. The conductivity ...
In the global landscape of technological advancement, emerging markets are emerging as powerful engines of growth, driving demand for high – quality infrastructure and electronic components. Among these, coaxial cable, a vital ele...
What is High-Frequency Signal Integrity?Signal integrity refers to the ability of a cable to transmit signals without distortion or degradation. At high frequencies (1 GHz to 100+ GHz), challenges include:
Attenuation: Signal lo...
Micro coaxial cables are critical components in countless modern devices, from smartphones and medical instruments to aerospace systems and automobiles. Ensuring their reliability and performance demands strict adherence to specific man...
Electric Vehicles (EVs) promise a cleaner, quieter future, but their complex high-voltage battery packs require constant, precise monitoring to ensure safety, performance, and longevity. At the heart of this critical task lies the Batte...
The short answer is yes, coaxial cable assemblies can be recycled after use—but the process requires careful handling due to their composite structure. As the world grapples with the growing problem of electronic waste (e-waste), recycl...
When engineers specify micro coaxial cable assemblies, one of the first and most critical questions is: “What impedance values can you actually achieve?”The answer determines signal integrity, return loss, and overall system performance...
Selecting the right coaxial cable assemblies is critical for optimizing the performance, reliability, and longevity of radio systems. Whether for amateur radio, commercial communication, or industrial wireless applications, suboptimal c...
Micro-coaxial cables, with diameters typically ranging from 0.5 mm to 2.2 mm, are widely used in high-frequency applications such as medical devices, aerospace systems, and high-speed data communication. However, their compact size an...
Choosing the right insulation material is critical when designing or selecting micro coaxial cables, especially for demanding RF (radio frequency) and microwave applications. Polytetrafluoroethylene (PTFE) and fluorinated ethylene propy...
In the realm of outdoor lighting systems, the selection of appropriate cabling solutions is a critical factor that directly impacts performance, reliability, and longevity. As outdoor lighting continues to evolve—from traditional street...
When working with electronics, robotics, or high-frequency communication systems, understanding the properties of cables is crucial. One common question is: What is the typical impedance of a micro coaxial cable? In this article, ...
Micro coaxial cables are essential for high-frequency signal transmission in compact applications like medical devices, aerospace systems, wearables, and 5G infrastructure. The jacket (outer insulation) is critical for performance...
Coaxial cables, a staple of wired communication since the 1930s, continue to thrive in modern technology despite competition from fiber optics and wireless solutions. Their unique design—combining high bandwidth, durability, and electro...
In industries ranging from automotive electronics to aerospace and smart home installations, the demand for coaxial cables that perform reliably in narrow spaces has grown exponentially. Traditional coaxial cables, however, often strugg...
The Next Frontier in IoT Connectivity
As IoT networks expand to 75 billion devices by 2025 (per Statista), legacy cabling solutions struggle with bandwidth demands. Micro-coaxial cables—featuring diameters under 1mm—are emerging as a...
IntroductionThe rapid evolution of augmented reality (AR) and virtual reality (VR) headsets is pushing hardware components to their limits. One critical yet often overlooked element is the micro-coaxial cable, a tiny but vital part res...
In the rapidly evolving landscape of medical diagnostics, precision, reliability, and miniaturization have become the cornerstones of technological advancement. Among the countless components that power cutting-edge diagnostic equipment...
As smart agriculture transforms traditional farming into data-driven precision operations, the demand for robust, high-performance connectivity solutions has never been greater. Micro-coaxial cables (micro-coax), with their compact desi...
The realm beneath the ocean’s surface holds immense potential, from deep-sea resource exploration and environmental monitoring to underwater infrastructure inspection and defense applications. Submersible drones (or ROVs – R...
Coaxial cables are indispensable components in numerous systems, ranging from communication networks to home entertainment setups, as they play a vital role in transmitting signals stably and efficiently. To ensure their long-term relia...
A significant breakthrough has been achieved in the coaxial cable sector with the successful completion of a crucial technical upgrade. This advancement marks a new chapter in the performance and application of coaxial cables, promising...
Last week, a highly anticipated online Q&A session on coaxial cables was successfully held, attracting hundreds of industry professionals, DIY enthusiasts, and individuals seeking to upgrade their home networks. The session featured...
You’re designing the next generation of wearables, cramming more sensors into minimally invasive medical devices, or pushing the limits of high-speed data transfer in tight spaces. You need micro-coaxial cables – cables incredibly...
The Challenge with Traditional Micro-Coaxial Connectors
Micro-coaxial cables (often called “micro-coax”) are essential for high-frequency signal transmission in electronics, medical devices, and telecommunications. Howeve...
In the harsh and unforgiving environment of space—where extreme temperatures, intense radiation, and vacuum conditions prevail—reliable signal transmission is critical to the success of satellites, space probes, and orbital stations. Mi...
n an era defined by lightning-fast connectivity and shrinking electronic devices, micro coaxial cables have emerged as unsung heroes powering the seamless flow of data. These miniature yet mighty cables are engineered to meet the escala...
Imagine trying to pour an entire swimming pool through a garden hose. That’s the challenge of transmitting stunning 8K video – a flood of visual data demanding unprecedented speed and precision. The secret weapon making this possi...
In response to the growing global demand for sustainable waste management and the urgent need to reduce electronic waste (e-waste), our factory is proud to announce the official launch of our Coaxial Cable Recycling Program. This initia...
In the ever – evolving landscape of traffic management systems, the role of reliable communication infrastructure cannot be overstated. Coaxial cable has emerged as a crucial component in enabling the seamless operation of various...
The short answer is: Yes, coaxial cable assemblies are not only compatible with 5G network devices but also play a critical role in 5G signal transmission—provided they meet 5G’s unique technical requirements. Unlike 4G, 5G relies on hi...
In the highly demanding and technologically advanced fields of aerospace and avionics, every component plays a crucial role in ensuring the safety, reliability, and optimal performance of aircraft and spacecraft. Among these components,...
Micro-coaxial cables, the unsung heroes carrying critical signals in everything from smartphones and medical devices to aerospace systems and industrial robots, demand impeccable quality. When reliability and performance are non-negotia...
In the realm of military operations, seamless and secure communication is not just a convenience but a critical determinant of mission success and the safety of personnel. Amidst the array of technologies that enable this, coaxial cable...
As 5G networks continue to expand globally, the demand for reliable, high-performance Distributed Antenna Systems (DAS) has never been greater. DAS plays a critical role in extending 5G coverage, improving signal quality, and supporting...
Our factory’s coaxial cable R&D team has recently clinched a prestigious industry award, a well-deserved recognition of their relentless efforts and outstanding innovations in the field.
The award, presented by a leading au...
KEL’s Micro Coaxial Cable solutions are at the forefront of modern electronic connectivity, offering exceptional performance in high-speed data transmission, miniaturization, and reliability. These connectors are integral to various.
OverviewMicro-Coax for HD Video is a cutting-edge coaxial cable engineered to deliver uncompromised high-definition video quality across professional and industrial applications. Designed for reliability, precision, and versatility,.
Contact Us Micro Coaxial Cable factory-(FRS).
Feel free to reach out to us for any inquiries or orders