
Micro Coaxial Cable factory-(FRS)
Proper installation of a coaxial cable is essential to ensure optimal performance, whether it’s for your TV, internet, or other communication systems. A well-installed coaxial cable can minimize signal loss, reduce interference, and provide a stable and reliable connection. In this guide, we’ll walk you through the step-by-step process of installing a coaxial cable for the best possible results.
Before starting the installation, it’s crucial to have all the right tools on hand. Here are the essential tools you’ll need:
Having these tools ready will make the installation process much smoother and ensure that each step is done correctly, which is vital for optimal performance. Using the right tools helps avoid damage to the cable and ensures secure connections, both of which directly impact signal quality.
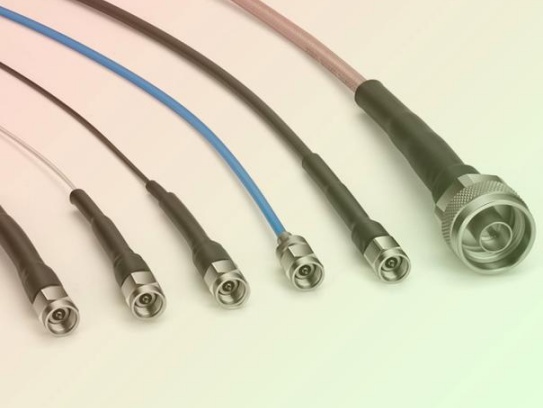
Not all coaxial cables are created equal, and selecting the appropriate one for your specific application is key to achieving optimal performance. Coaxial cables consist of a center conductor, insulator, shielding, and outer sheath. Different types of coaxial cables have varying characteristics that make them suitable for different uses:
Consider the distance the signal will travel, the frequency of the signal, and the environment in which the cable will be installed (e.g., indoors or outdoors). For most home users, RG-6 is a safe and reliable choice. Choosing the wrong cable can lead to excessive signal loss, which results in poor performance, such as fuzzy TV images or slow internet speeds.
Carefully planning the path of the coaxial cable is essential to minimize signal interference and ensure a neat and efficient installation. Here are some tips for planning the path:
By planning a proper path, you can reduce the risk of signal issues and make future maintenance or upgrades easier.
Once you’ve planned the path, it’s time to cut the coaxial cable to the desired length. Use the coaxial cable cutter to make a clean, straight cut. Avoid bending or twisting the cable excessively while cutting.
After cutting, use the coaxial cable stripper to remove the outer sheath. Follow the stripper’s instructions to set the correct depth, ensuring that you don’t cut into the shielding or inner conductor. Gently twist and pull the stripper to remove the outer sheath, exposing the shielding.
Next, fold back the shielding to expose the inner insulator. Be careful not to damage the inner conductor while doing this. Then, use the stripper again to remove a small portion of the inner insulator, exposing about 1/4 inch of the inner conductor. Make sure the inner conductor is straight and not bent or damaged.
Proper cutting and stripping are critical because any damage to the inner components can lead to signal loss or interference. A clean, precise strip ensures a good connection with the connector.
Now it’s time to attach the connector to the end of the coaxial cable. Slide the connector onto the cable, making sure that the inner conductor protrudes through the center of the connector. The shielding should be in contact with the outer part of the connector.
Use the crimping tool to crimp the connector onto the cable. Position the crimping tool over the connector and squeeze firmly to create a secure bond. Check that the connector is tight and doesn’t move or come loose. A loose connector can cause signal loss and intermittent connections.
It’s important to use the correct crimping technique for the type of connector you’re using. Follow the manufacturer’s instructions to ensure a proper crimp. After crimping, inspect the connector to make sure there are no gaps or loose parts.
Once the connectors are attached, it’s time to secure the coaxial cable along the planned path. Use cable clips or staples to fasten the cable to walls, baseboards, or other surfaces. Space the clips or staples evenly, typically every 12-18 inches, to prevent the cable from sagging or moving.
When securing the cable, avoid over-tightening the clips or staples, as this can damage the cable’s outer sheath or inner components. Leave a small amount of slack to allow for movement without straining the cable.
If running the cable through walls or ceilings, use appropriate cable management products to protect the cable and keep it organized. This not only helps with the appearance but also prevents damage to the cable from other elements in the wall or ceiling.
After installing and securing the coaxial cable, it’s essential to test the signal to ensure optimal performance. Connect one end of the cable to the source device (e.g., antenna, modem) and the other end to the destination device (e.g., TV, router).
Turn on the devices and check for a clear signal. For TV, look for sharp images with no snow or distortion. For internet, test the speed and stability using an online speed test tool. If you notice any issues, such as a weak signal or interference, check the connections first. Ensure that the connectors are tight and properly crimped. If the problem persists, inspect the cable for damage or kinks along the path.
You can also use a signal strength meter to measure the signal level. This tool provides a more accurate reading of the signal strength and can help identify any areas where signal loss is occurring.
In addition to proper installation, several factors can affect the performance of a coaxial cable:
To keep your coaxial cable performing optimally, regular maintenance is important:
By following these installation steps and considering the factors that affect performance, you can ensure that your coaxial cable provides a reliable and high-quality signal for years to come. Proper installation not only enhances performance but also reduces the need for frequent repairs or replacements, saving you time and money in the long run.
Our factory offers high-quality products at competitive prices
H1: Precision Instrument Micro-Coax – Engineered for Critical Signal Integrity Meta Description: Discover Precision Instrument Micro-Coax: Miniature coaxial cable solution optimized for high-frequency signal transmissio.
OverviewMicro-Coax for HD Video is a cutting-edge coaxial cable engineered to deliver uncompromised high-definition video quality across professional and industrial applications. Designed for reliability, precision, and versatility,.
Feel free to reach out to us for any inquiries or orders