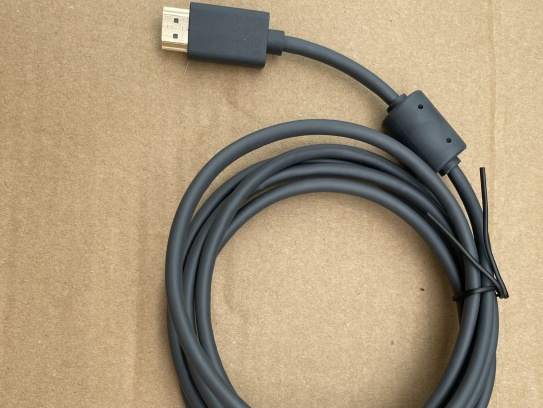
Micro coaxial cables (micro coax) are the hidden heroes of our digital lives. Found inside smartphones, laptops, cameras, drones, and countless other devices, these tiny cables carry crucial video signals (like HDMI or camera feeds) and high-frequency data. But their small size makes them incredibly vulnerable. A sharp bend, accidental pinch, pet chewing, or repeated flexing can damage them, leading to frustrating signal loss, flickering screens, or complete failure.
Can you fix a damaged micro coax cable? The answer is sometimes yes, but proceed with caution. Repairing micro coax is delicate work and requires specific tools and skills. For mission-critical devices or expensive gadgets, professional repair is always the safest option. However, for less critical cables or if you enjoy DIY electronics, a careful repair might be possible.
Important Safety Note: Always disconnect the device from any power source and remove batteries before attempting any repair on internal cables.
Tools You Might Need:
- Sharp Precision Wire Strippers or Small Craft Knife: For extremely careful removal of insulation.
- Fine-Tip Soldering Iron & Solder: Essential for rejoining the center conductor.
- High-Quality Electrical Tape or, Preferably, Heat-Shrink Tubing: For insulation and strain relief (choose the smallest diameter heat shrink appropriate for micro coax).
- Magnifying Glass or Head-Mounted Magnifier: Crucial for seeing the tiny conductors.
- Fine Tweezers: For handling delicate parts.
- Multimeter: For checking continuity after the repair.
- Lighter or Heat Gun (Low Setting): For shrinking heat shrink tubing.
- **(Optional) Replacement Connector:** If the damage is near the end.
Assessing the Damage: Finding the Break
The first step is locating where the damage happened. Look for obvious signs:
- Visible Kinks or Crushes: A flattened section of the outer jacket.
- Outer Insulation Cut or Scraped: Exposing the braided shield underneath.
- markdown复制
**Exposed Center Conductor:** The small central wire poking through the insulation.
Gently flex the cable along its length while connected to a device (if safe to do so) to see if the signal flickers, indicating the break point. If disconnected, a multimeter in continuity mode can help trace the break (touch probes to the center pin of each connector).
Repair Methods (Based on Damage Type):
1. Damage to ONLY the Outer Jacket (Plastic Cover):
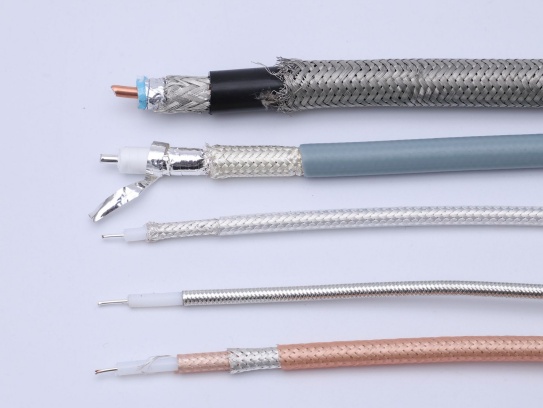
- Scenario: The outer plastic insulation is cut or scraped, but the underlying metal braid (shield) and inner white insulator are intact.
- Risk: Although minor, it exposes the shield, increasing future risk of shorts or further damage.
- Repair:
- Clean the area thoroughly.
- Cut a small piece of quality electrical tape OR a small diameter piece of heat shrink tubing slightly longer than the damaged section.
- Carefully wrap the tape snugly over the damage, ensuring no shield wire strands poke out. OR Slide the heat shrink tubing over the damage and apply gentle heat to shrink it securely. Heat shrink provides a more durable and professional repair.
2. Damage to Outer Jacket AND Shield Braid:
- Scenario: The outer plastic is damaged and the fine braided metal mesh underneath is exposed or frayed.
- Risk: High risk of signal interference and potential shorts if any braid strands touch the center conductor. Signal degradation is likely.
- Repair:
- Isolate the Shield: Carefully trim away any loose strands of the braided shield using fine tweezers or sharp flush cutters. Be extremely careful not to cut the inner white insulator.
- Insulate: Wrap the exposed area tightly with electrical tape or use heat shrink tubing (see Step 1) to completely cover the exposed shield and prevent any shorts. This won’t restore the shielding perfectly but mitigates the main risk. Significant shield damage significantly compromises performance.
3. Damage to the Center Insulator:
- Scenario: The damage has reached the white inner insulator surrounding the very thin center conductor. The conductor itself might or might not be broken.
- Risk: The exposed conductor is fragile and prone to breaking, or may already be broken causing signal failure.
- Repair:
- If Conductor is Intact: Clean the area meticulously. Wrap the damaged insulator section carefully with several thin layers of electrical tape OR slide heat shrink tubing over it and shrink. The goal is to securely re-insulate the center conductor without moving it. Handle the cable incredibly gently as the conductor is weak here.
- If Conductor is Broken or Needs Access: This leads into the next, most complex repair.
4. Severed Center Conductor OR Damage Near Connector:
- Scenario: The thin core wire inside is broken, or the damage is too close to the connector to isolate/insulate effectively.
- Risk: Complete signal failure.
- Repair (Advanced / Requires Soldering):
- Identify Break: Locate the exact break point.
- Cut Out Damaged Section: Using sharp flush cutters, cut out the damaged section completely, leaving two clean ends.
- Strip Cables Carefully:
- End 1 & End 2: Carefully strip back about 3-4 mm (1/8 inch) of the outer plastic jacket. Avoid nicking the braided shield.
- Gently fold the braided shield back neatly over the outer jacket on each end. Be careful, it frays easily!
- Carefully strip back about 2-3 mm (approx. 1/12 inch) of the inner white insulator, exposing the very fine center conductor on each end. Use minimal force.
- Tin the Center Conductors:
- Apply a tiny amount of solder directly to the tip of your fine soldering iron.
- Gently touch the iron tip to the exposed center conductor end to melt the solder onto it. Don’t hold too long or use too much heat or solder – you risk melting the insulator. This step requires practice on scrap wire first.
- Repeat for the other center conductor end.
- Solder the Center Conductors:
- Hold the two prepared cable ends together, ensuring the tinned center conductors touch directly, end-to-end.
- Apply the slightest amount of fresh solder to your iron tip.
- Briefly touch the iron tip where the two conductors meet, allowing the solder on both conductors to flow together. Remove heat quickly once fused. The goal is a tiny, solid joint – not a blob.
- Insulate the Joint:
- Cut a small piece of the inner white insulator material (if available) or use heat shrink tubing to cover the soldered center joint. This provides primary insulation.
- Slide small-diameter heat shrink tubing over one cable end before starting step 3! Move it aside during soldering, then slide it back over the entire joint area including the folded-back braid. Heat shrink provides insulation, shield connection, and strain relief.
- Reconnect the Shield (Optional but Recommended):
- While difficult at this tiny scale, try to overlap the folded-back braid from each cable end where possible.
- You can attempt to lightly solder the shield braids together where they overlap, but this is extremely challenging and risks melting insulators. Often, ensuring they both touch under the heat shrink tubing is the practical solution, though not electrically perfect.
- Apply Outer Insulation / Strain Relief:
- Slide a second, larger piece of heat shrink tubing over the entire repaired section (covering the first heat shrink and joint area). Shrink it to provide the final layer of protection and strain relief. If using tape, wrap several layers securely.
5. Replacement Connector (If End is Damaged):
- If the damage is right at the connector, the most reliable repair is often cutting off the damaged connector and soldering on an exact replacement. This requires:
- Obtaining the correct micro coax connector.
- Very carefully stripping the cable end to the specific lengths needed for that connector.
- Soldering the fine center pin and soldering/shielding the braid to the connector body according to its design.
- This is generally a job for specialists with microscope soldering stations and connector-specific jigs.
Temporary Fix (Use with Extreme Caution):
- If a signal wire is merely exposed (like the shield or a minimally disturbed center conductor) and not broken, carefully wrapping it with electrical tape can be a temporary solution to prevent shorts. This is NOT reliable for signal integrity, prone to failure, and should only be done if you understand the risks and urgently need a quick fix before proper repair or replacement. Never use on a visibly broken conductor.
Testing the Repair:
- Before reassembling your device, carefully test the cable if possible:
- Continuity Test: Use a multimeter to check continuity between the center pins at each end. Then check for continuity between the outer shells/shields at each end. There should be good connection (low resistance) for both.
- Function Test: Reconnect the cable carefully within the device or to test equipment. Power on and check for a stable signal.
Critical Considerations & When to Seek Professional Help:
- Skill Level Required: Soldering micro coax center conductors is difficult even for experienced hobbyists due to the scale (often less than 0.5mm thick). Practice first!
- Size Matters: The thinner the coax and its center wire, the harder the repair. Standard RG-174 is challenging; smaller cables inside consumer gadgets are exponentially harder.
- Signal Integrity: Even a technically “connected” repair can introduce impedance mismatches or signal loss. It might work, but not perfectly, especially for high frequencies.
- Time & Tools: It often takes significant time and requires specialized tools like a temperature-controlled soldering iron and magnifier.
- Device Value vs. Risk: Consider the cost and importance of the device. Botching an internal repair can cause further damage. For expensive laptops, phones, or critical equipment, professional repair is strongly recommended. Reputable shops have the right tools, skills, and spare parts.
- Permanent Solution: Often, replacing the entire cable is the most reliable long-term solution if a spare part is available. Sometimes replacement cables are inexpensive.
Prevention is Key!
- Avoid sharp bends and kinks when handling devices or routing cables.
- Be mindful of closing laptop lids or device cases to avoid pinching cables.
- Protect devices from pets that might chew cables.
- Handle internal cables with care during any DIY work.
Conclusion:
Repairing damaged micro coaxial cables is possible, but it’s a specialized task requiring patience, precision tools, and realistic expectations about signal quality post-repair. Assess the damage carefully, weigh your skills against the device’s value and criticality, and prioritize safety. For kinked jackets or slightly nicked shields, a simple insulation wrap might suffice. However, for severed center conductors or damage near connectors, especially in modern compact devices, seeking professional electronics repair is usually the wisest and safest choice. When in doubt, go pro!
Have you ever attempted a micro coax repair? Share your experiences or questions in the comments below!