That flicker in your CCTV image. That frustrating “No Signal” message popping up randomly. Intermittent signal loss plagues many micro-coaxial CCTV systems. Unlike a constant failure, these random dropouts are notoriously difficult to pinpoint. They compromise your security precisely when you need it most. Don’t suffer through the uncertainty! This guide cuts through the frustration, offering clear, actionable steps to find the culprit and restore rock-solid video feeds.
Why is Intermittent Loss Such a Headache?
Unlike constant failures, intermittent problems come and go. What works perfectly one minute might fail the next. This randomness makes it incredibly hard to replicate the issue when you’re testing, leaving you chasing ghosts. Factors like temperature changes (contracting/expanding cables), minor vibrations, fluctuating power, or partial physical damage often trigger these elusive dropouts.
Top Culprits Behind Your Intermittent Signal Problems:
- Failing BNC Connectors & Terminations: This is the **#1 most common cause** of intermittent problems.
- Loose Connections: Connectors not fully tightened can vibrate slightly, losing contact.
- Poor Crimping/Soldering: Internal connections within the connector are weak or breaking. Movement or temperature shifts can sever the connection temporarily.
- Corrosion/Oxidation: Moisture ingress causes connectors or copper strands to corrode. Green or white powdery deposits are a tell-tale sign. Corrosion increases resistance, leading to dropouts.
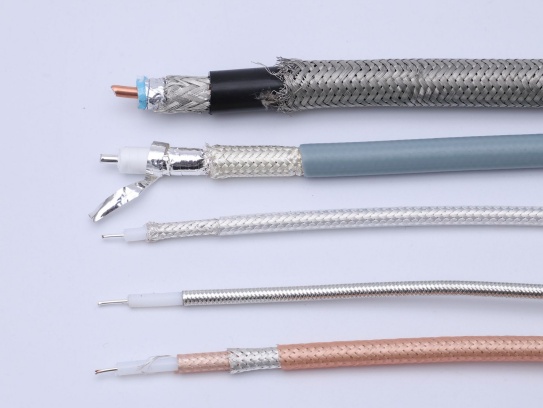
- Improper Impedance: Badly made connectors disrupt the cable’s impedance (ideally 75 ohms), causing signal reflections and loss. Use quality 75-ohm BNC connectors!
- Physical Damage: Bent pins or damaged connector bodies inside the housing.
- Damaged Micro-Coaxial Cable:
- Kinks, Crushing, Staples: Any sharp bend exceeding the cable’s minimum bend radius or physical compression damages the delicate internal shield/core structure.
- Animal Chewing: Rodents love cables! Partial bites can expose the core or shield intermittently touching.
- Water Ingress: Water inside the cable degrades the dielectric, causes corrosion, and leads to capacitance changes and signal loss – often worsening with temperature/humidity shifts. Check for swollen or stiff cable sections.
- Poor Quality Cable: Thin or sub-standard shielding provides inadequate protection against interference. Low-quality copper or dielectrics lead to excessive signal loss, especially on long runs.
- Problematic Power Supplies:
- Insufficient Power Output: Power supplies operating near their max limit can dip during demand spikes (e.g., IR cut filter switching at night, camera startup), causing voltage drops and camera reboots/signal loss.
- Power Ripple/Noise: Low-quality power supplies generate electrical noise on the power lines. This noise can couple onto the video signal through the camera or shared power runs, degrading the image intermittently.
- Overloaded Power Circuit: Too many cameras on a single transformer or power circuit. High power draw at certain times causes voltage sag at distant cameras.
- Failing Power Supply: An aging or defective power supply may output erratic voltage.
- Interference (EMI/RFI):
- Electrical Noise Sources: High-voltage lines, motors, transformers, fluorescent lights, dimmer switches, or switching power supplies near your coaxial cable can induce interference.
- Poor Shielding: Using RG59 instead of higher-grade RG6 (especially on longer runs) or damaged cable shielding offers less protection.
- Improper Grounding/Loops: Lack of proper grounding at the DVR/NVR or ground loops can create interference paths. Note: Grounding micro-coaxial itself isn’t typical; grounding issues often affect the power lines or chassis instead.
- Camera or DVR/NVR Issues (Less Common, But Possible):
- Internal Camera Fault: A failing component (like a capacitor) within the camera can cause intermittent operation or signal loss. Issues often correlate with temperature changes.
- DVR/NVR Input Fault: A damaged port or failing component on the recorder affecting a specific channel.
- Incompatible Firmware: Rare, but firmware bugs might cause instability with specific cameras.
Systematic Diagnosis: Your Step-by-Step Troubleshooting Plan
- Gather Intel: Note exactly when loss happens (time of day, weather, specific camera views). Does it correlate with HVAC kicking on? Lights turning on? Heavy rain? Night/day?
- Physical Inspection – Start Simple! (Focus on Connectors!):
- Inspect EVERY BNC Connection: At the camera, DVR/NVR, splitters, and junction boxes. Tighten them firmly. Look closely for corrosion (green/white deposits), bent pins, moisture, or physical damage. Remove, clean contacts with electronic contact cleaner and a cotton swab/bristle brush, and re-seat suspect connectors. Replace any visually damaged ones IMMEDIATITY.
- Inspect Cable Runs: Look for visible damage, sharp bends (< camera cable’s min bend radius), kinks, staples, crushed sections, signs of animals, or areas exposed to water/weather. Check near pull points.
- Inspect Camera Power & Connections: Ensure power connections are secure at the source (transformer, power distribution box) and at the camera. Use a multimeter to check voltage at the camera’s pigtail when powered (should be ~12V DC for most analog HD cams).
- Test & Isolate – Narrow Down the Problem:
- Cross-Test Power Supplies: Swap the power supply for the problematic camera with one known to be working well on another channel. Do the problems follow the power supply?
- Cross-Test Camera Channels: Swap the cable connection for the problematic camera channel at the DVR/NVR with a connection for a known good camera channel. Does the problem stay on the same physical port (indicating a possible DVR input fault) or move with the camera connection (indicating a camera, cable, or power issue)?
- Test with a Temporary Cable: Run a temporary RG6 micro-coaxial cable (and preferably temporary power) directly from the suspect camera to the DVR/NVR, bypassing the entire existing run and any junctions. Does the problem disappear? If yes, the fault is definitely in the original cable run or power supply. If not, the camera or DVR input is more suspect.
- Segmentation Testing: If you suspect a break within the cable run but can’t run a temp line, an “RJ-45 Explorer Pro” or similar cable toner/polarity checker adapted for coaxial can help locate shorts (use tone mode) or opens (continuity mode) when the fault is active. This requires some interpretation.
- Check Power Rigorously:
- Measure Voltage Under Load: With a multimeter, measure the voltage at the camera end when the camera is operating (especially at night when IR is on). It should be stable and close to 12V (e.g., >= 11V). A significant drop indicates insufficient power or overload.
- Check Power Supply Specifications: Verify the power supply Amperage (A) rating. Ensure the total load (cameras + IR current) doesn’t exceed 80% of its capacity. Calculate distance losses.
- Try a Higher Amp Power Supply: If voltage drops, try a known-good, adequately rated power supply dedicated only to the suspect camera.
- Consider Interference:
- Observe the Pattern: Does the dropout correlate with machinery turning on/off nearby? Lights? Heavy electrical loads?
- Reroute Cable Temporarily: If possible, move the micro-coaxial cable away from potential sources (power lines, transformers, motors) as a test. Does the interference stop?
- Check Grounding: Ensure the DVR/NVR chassis and power supplies are grounded correctly per manufacturer specs. Verify electrical outlets have proper grounds.
- Isolate Camera/DVR:
- If swapping cables/power hasn’t solved it, and you’ve eliminated those paths, connect the suspect camera to a different channel input on the DVR/NVR.
- Connect the suspect camera to a known-good different recorder (if available).
- Connect a known-good camera to the original suspect input channel. This helps determine if the camera itself is faulty or if it’s a specific input issue on the recorder.
Prevention: Building a Reliable Micro-Coaxial System
- Invest in Quality Cable: Use RG6 over RG59 for longer runs (>150ft) and critical applications due to its better signal handling and shielding.
- Buy Certified Components: Source cameras and DVRs/NVRs from reputable manufacturers known for reliability.
- Use Excellent Power Supplies: Choose robust, adequately rated (Amps), low-noise linear or regulated switching power supplies from reputable brands. Consider calculating and budgeting for voltage drop over distance. Centralized quality power is often better than multiple wall warts.
- Waterproof Connections Religiously: Use dielectric grease inside EVERY outdoor or potential moisture-prone connection (especially BNCs!). Employ IP-rated junction boxes and conduit seals (dome or compression fittings) for all outdoor connections.
- Practice Impeccable Termination: Use the correct tools (quality RG6 crimper/stripper) and high-quality, genuine 75-ohm BNC connectors designed for your specific cable type (e.g., RG6). Follow manufacturer instructions meticulously. Poor termination is the prime suspect in most failures.
- Follow Proper Installation Techniques: Avoid sharp bends. Use cable clips/saddles correctly. Keep micro-coaxial away from power lines where possible. Use surge protection.