Coaxial cables are the unsung heroes of modern connectivity, powering everything from home televisions and internet routers to security cameras and satellite systems. Their unique design—featuring a central conductor, insulating layer, metallic shield, and outer jacket—ensures reliable signal transmission with minimal interference. However, even the highest-quality coaxial cable assembly is only as good as its termination. A poorly cut or improperly terminated cable can lead to signal loss, interference, or even complete connection failure.
The good news? You don’t need to be a professional technician to cut and terminate coaxial cable assemblies at home. With the right tools, a bit of patience, and a step-by-step approach, you can achieve professional-grade results. This guide will walk you through the entire process, from selecting the right tools to testing your finished connection, ensuring your coaxial cable assemblies deliver optimal performance.
Understanding Coaxial Cable Basics
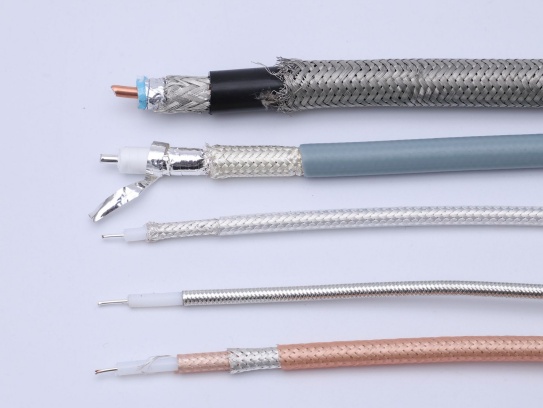
Before diving into the cutting and termination process, it’s important to understand the anatomy of a coaxial cable. This knowledge will help you handle each layer correctly, avoiding damage that could compromise signal quality:
- Central Conductor: Typically made of copper or copper-plated steel, this carries the electrical signal.
- Dielectric Insulator: A non-conductive layer (often foam or plastic) that separates the central conductor from the shield, maintaining signal integrity.
- Shield: A metallic layer (braided, foil, or a combination) that blocks electromagnetic interference (EMI) and radio frequency interference (RFI).
- Outer Jacket: A durable, weather-resistant plastic layer that protects the internal components from physical damage, moisture, and corrosion.
Common coaxial cable types used in home settings include RG6 (ideal for cable TV, satellite, and high-speed internet) and RG59 (often used for security cameras and short-distance video). The termination process is similar for most types, but always check that your connectors are compatible with your cable gauge.
Essential Tools for Cutting and Terminating Coaxial Cables
Having the right tools is critical for clean, precise work. Here’s what you’ll need:
- Coaxial Cable Cutter: A sharp, specialized cutter designed to make clean, perpendicular cuts without crushing or distorting the cable. Avoid using regular scissors or utility knives, as they can damage the inner components.
- Coaxial Stripper: A tool with adjustable blades to remove the outer jacket, shield, and dielectric in one or more steps. Look for a stripper compatible with your cable type (e.g., RG6, RG59).
- Crimping Tool: Used to secure connectors to the cable. Choose a tool matched to your connector type (e.g., F-connectors, BNC connectors).
- Connectors: High-quality connectors (e.g., F-connectors for TV/internet, BNC for security systems) designed for your cable gauge.
- Wire Brush or Cloth: To clean the central conductor and shield, removing any debris or oxidation.
- Multimeter or Cable Tester: To check for continuity and signal strength after termination.
- Marker or Tape: For marking cut lines, ensuring straight, even cuts.
Step-by-Step Guide to Cutting Coaxial Cable
- Measure and Mark the Cable
Determine the length of cable you need, then mark the cut line with a marker or tape. Add a small buffer (1–2 inches) to account for stripping and termination—this ensures you won’t end up with a cable that’s too short.
- Make a Clean Cut
Place the cable in the coaxial cutter, aligning the mark with the cutting blade. Close the cutter firmly in one smooth motion to create a straight, perpendicular cut. A jagged or angled cut can lead to poor connector fit and signal loss, so take your time here.
- Inspect the Cut End
After cutting, check the end of the cable. The central conductor should be straight and undamaged, the dielectric should be intact, and the shield should be evenly trimmed. If any layer is crushed or frayed, recut the cable to remove the damaged section.
Step-by-Step Guide to Terminating Coaxial Cable
Termination is the process of attaching a connector to the cut end of the cable. The exact steps vary slightly by connector type, but we’ll focus on F-connectors (the most common for home TV and internet) as an example.
- Strip the Cable Layers
- Adjust your coaxial stripper to match your cable type (e.g., RG6). Most strippers have preset depths for different layers.
- Insert the cable into the stripper, ensuring it’s seated fully. Squeeze the stripper handles firmly and twist 1–2 times to cut through the outer jacket, shield, and dielectric.
- Pull the stripper away from the cable end to remove the stripped layers. You should now see:
- A small section of the central conductor (typically ¼–⅜ inch).
- Exposed dielectric (½–¾ inch) surrounding the conductor.
- The shield, which should extend just beyond the dielectric.
- The outer jacket, which should sit flush with the base of the stripped area.
- Prepare the Shield
Fold the shield back over the outer jacket. This ensures it makes proper contact with the connector and prevents interference. Use a wire brush or cloth to gently clean the central conductor—oxidation or debris can hinder signal flow.
- Attach the Connector
- Slide the connector onto the cable end. For F-connectors, twist the connector clockwise (by hand first) until it’s snug against the outer jacket. The dielectric should fit into the connector’s inner sleeve, and the central conductor should protrude slightly from the end of the connector (about 1/16 inch).
- Avoid over-tightening by hand, as this can damage the dielectric or conductor.
- Crimp the Connector
Place the connector into the appropriate slot of your crimping tool (matched to the connector size). Squeeze the tool firmly until the crimping jaws fully close. This secures the connector to the cable, ensuring a tight, durable connection.
- Inspect the Termination
Check that the connector is straight and secure. The central conductor should be centered and undamaged, and the shield should be fully enclosed by the connector. If the connector is loose or misaligned, remove it (using a connector remover tool if needed) and repeat the process.
Testing Your Terminated Coaxial Cable
A successful termination requires more than just a tight fit—it needs to transmit signals reliably. Here’s how to test:
- Continuity Test: Use a multimeter set to “ohms.” Touch one probe to the central conductor and the other to the connector’s outer shell. A reading of near-zero indicates a short circuit (a problem), while an infinite reading (or “OL”) means the connection is intact.
- Signal Test: Connect the cable to your device (e.g., TV, router) and check for a strong, clear signal. If you notice pixelation, static, or slow speeds, the termination may be faulty—reinspect and recrimp if necessary.
- Weatherproofing (Optional): For outdoor cables, apply silicone sealant or heat-shrink tubing around the connector to protect against moisture, which can cause corrosion over time.
Common Mistakes to Avoid
- Over-Stripping: Removing too much of the outer jacket or dielectric can expose the shield to damage and weaken the connection.
- Under-Stripping: Leaving too much jacket or dielectric can prevent the connector from seating properly, leading to signal loss.
- Damaging the Central Conductor: Bent or cut conductors disrupt signal flow. Always handle the conductor gently.
- Poor Shield Contact: Failing to fold the shield over the jacket can result in interference. Ensure the shield makes full contact with the connector.
Why Quality Matters in Coaxial Cable Assemblies
Even the most careful termination won’t compensate for low-quality cables or connectors. Cheap materials can degrade quickly, leading to signal loss, corrosion, or breakage. Investing in high-quality coaxial cable assemblies ensures long-lasting performance, whether you’re setting up a home theater, security system, or internet network.
At FRS, we understand that reliable connectivity starts with superior materials and precision engineering. Our coaxial cable assemblies are designed for both professional installations and DIY projects, featuring high-grade copper conductors, durable shielding, and weather-resistant jackets that stand up to the rigors of home use. Whether you’re cutting and terminating cables for your TV, internet, or security system, FRS cables provide the consistency and durability you need to achieve perfect terminations every time. Backed by our decades of expertise in manufacturing, FRS ensures that every cable meets strict quality standards, so you can trust your connections to perform—now and for years to come. Choose FRS, and experience the difference that quality makes in your home connectivity projects.