Micro-Coaxial Cable Shield Damage: How to Fix? Emergency Repair Steps - Micro Coaxial Cable factory-(FRS)
Micro Coaxial Cable factory-(FRS)
INFO
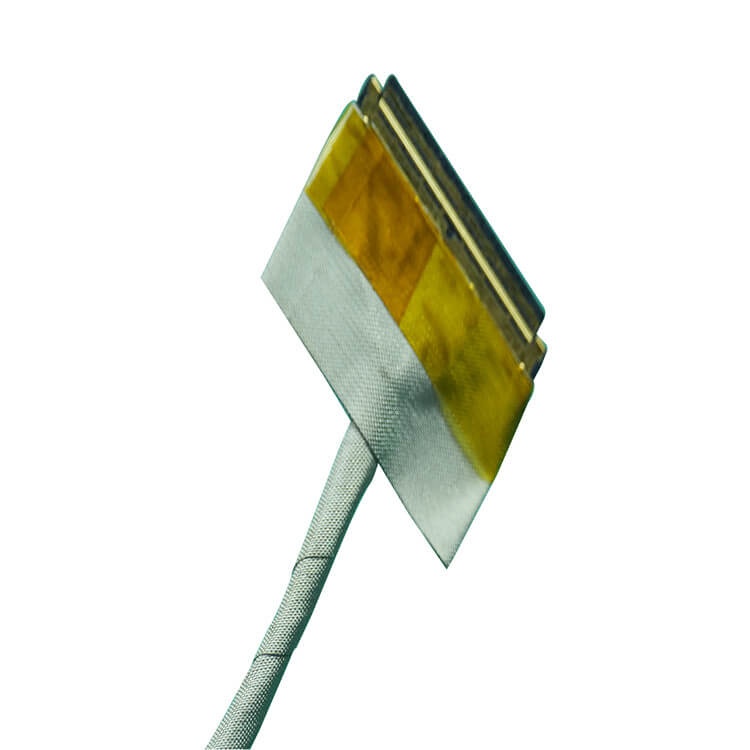
Introduction: That dreaded moment: you notice interference in your video signal, crackling in your audio, or a complete drop in your network connection. Upon inspection, you find a nick, tear, or exposed wire in the outer shielding of your micro-coaxial cable (like an RG174, RG178, or similar thin cable often used for security cameras, short antenna runs, or specialized equipment). Damaged shielding is a critical failure point. Its job is to block electromagnetic interference (EMI) and radio frequency interference (RFI) from disrupting the delicate signal carried by the inner conductor. Ignoring it leads to degraded performance or complete signal loss. But what can you do right now as an emergency fix? This guide provides safe, practical steps.
Why Emergency Fixes Are TEMPORARY: It’s crucial to understand that repairing damaged cable shielding is inherently problematic. Shield layers are designed during manufacturing for consistent coverage. Any repair creates a weak point. While the steps below can temporarily restore function, they are NOT a permanent solution. Always plan to replace the damaged cable section or the entire cable as soon as feasible for reliable, long-term performance.
Essential Safety Warning:
Disconnect Power FIRST: Always, always, ALWAYS disconnect any power source connected to the cable (power supply, device like a camera, etc.) BEFORE handling damaged cable. Micro-coaxial often carries DC power for devices like PoE cameras. Electrocution risk is serious.
Avoid Splicing Center Conductors: The focus here is only on repairing/shielding the outer damage. DO NOT attempt to cut and splice the tiny inner conductor(s) in a micro-coaxial cable unless you have specialized tools and expertise – this almost always destroys signal integrity. Our goal is shield continuity.
Emergency Repair Steps for Micro-Coaxial Shield Damage
Goal: Restore electrical continuity and some shielding effectiveness at the damaged site to get critical equipment operational temporarily.
You Will Need:
Electrical tape (preferably vinyl or high-quality)
Self-amalgamating (Self-fusing) tape (Highly Recommended – see below)
Alternative: Conductive copper tape or foil tape + Electrical tape
Scissors/utility knife (carefully!)
Rubbing alcohol or contact cleaner (optional, for cleaning)
Wire brush or sandpaper (fine grit, optional, use extreme care)
Cable tie (optional, for strain relief)
Step-by-Step Guide
DISCONNECT POWER: As emphasized above – unplug everything. Safety is paramount.
Assess & Inspect: Carefully examine the damage. How big is the tear or nick? Is the center dielectric (insulating layer) visible? Is the inner conductor (the center copper wire) exposed? Avoid touching the inner conductor if possible.
Clean & Prepare (Optional but Recommended):
If the area is dirty or greasy, gently wipe the damaged area and surrounding cable jacket with rubbing alcohol on a cloth. Let it dry completely.
If Braid is Corroded (Very Carefully!): If you see significant green/white corrosion on the braid at the damage site only, you might try gently rubbing it off with a fine wire brush or sandpaper. BUT BEWARE: Micro-coaxial braid is fragile! Aggressive cleaning can break more strands. Often, it’s safer to skip this step if the damage isn’t severe.
Attempt Braid Contact (If Possible):
If the braid strands are visibly cut or frayed, gently try to bring the ends closer together. Avoid excessive pulling that could break more strands or stretch the cable.
Apply the Primary Shield Repair:
Best Option: Self-Amalgamating Tape: This tape bonds molecularly to itself, creating a waterproof, insulating seal. It doesn’t conduct electricity.
Stretch the tape slightly as you wrap it tightly around the damaged area. Cover at least 1-2 inches on either side of the damage. Overlap each layer by 50%. Apply 3-5 layers. It fuses into a rubbery seal over ~15-30 minutes. This seals the area and provides mechanical strength, but NOT electrical continuity/shielding. Proceed to Step 6.
Carefully wrap conductive copper or aluminum foil tape around the damaged area. Overlap it generously (at least 1/2 inch to 1 inch) onto the intact shielding jacket on both sides of the damage. Press firmly to ensure good contact with the underlying shield braid where possible. The foil tape needs to bridge the break and touch solid braid on either side to restore electrical continuity and some shielding. Use a small piece big enough to cover the gap.
Immediately cover the foil tape patch tightly with several layers of standard electrical tape. This protects the conductive patch and prevents shorts.
Reinforce & Insulate:
Regardless of your primary repair method in Step 5, wrap the entire repaired section (and a bit beyond) tightly with standard electrical tape (vinyl is good). Build up several layers (3-4 minimum). Overlap generously.
This provides mechanical strength, strain relief, and additional insulation/sealing. It also helps hold the foil patch in place if you used one.
Add Strain Relief (Highly Recommended):
Especially if the damage is near a connector or bend point, secure a cable tie loosely on the cable just before and/or just after the taped repair section. This helps prevent flexing at the vulnerable repair site. Do NOT overtighten and crush the cable.
Reconnect & Test CAREFULLY:
Double-check everything is sealed.
Reconnect the cable to the device(s) and power supply.
Power on the system and test the signal. You should see a noticeable improvement over having the shield fully open, but performance might still be slightly degraded due to the inherent limitation of the repair.
Key Takeaways & When to Replace
Temporary Fix Only: This repair buys you time. Signal quality and shielding effectiveness will not be 100% restored to original levels. EMI can still leak in or out.
Weak Point: The repaired section is now the weakest point physically and electrically on the cable. It’s susceptible to future damage and water ingress.
Replacement is Mandatory: For reliable, long-term performance, especially in critical systems, you MUST replace the damaged cable section or the entire cable. Cut out the damaged portion and install a new connector if possible and practical. For micro-coax, replacing the entire run is often easier and ensures full performance.
Prevention: Protect your cables! Use cable clips, avoid sharp bends, run through conduit in harsh environments, and be mindful of pinching or crushing.
Ensuring the durability of micro coaxial cables is critical, especially their jacket abrasion resistance. These tiny cables (often less than 1mm OD) power essential applications like medical devices (endoscopes, catheters), robotics, dr...
Industrial grade micro coaxial cable is an ultra‑thin, high‑performance RF interconnect built for demanding applications that require precise impedance control, high‑density routing, and long‑term reliability under mechanical and enviro...
In the dynamic world of outdoor broadcasting, where every moment of live transmission matters, the quality and reliability of the equipment used are of utmost importance. One such crucial component is the weatherproof coaxial cable. Thi...
Unmanned Aerial Vehicles (UAVs), or drones, have revolutionized modern warfare. From intelligence, surveillance, and reconnaissance (ISR) to precision strikes and logistics, their impact on the battlefield is undeniable. However, the ha...
In industries ranging from telecommunications and aerospace to medical devices and industrial automation, standard-length coaxial cable assemblies often fail to meet the unique spatial, performance, and integration needs of specific pro...
Introduction
In an era of rapid digital transformation, coaxial cables remain a critical component of global communication infrastructure. As we navigate through 2025, the coaxial cable market is experiencing significant dynamics dri...
Imagine facing a tangled nest of identical, hair-thin micro-coaxial cables during a critical system upgrade or a frantic troubleshooting session. The seconds tick by as you meticulously trace connections, hoping you don’t misplug and ca...
Coaxial cables are indispensable in telecommunications, broadcasting, and aerospace, where even minor quality flaws can lead to signal loss, system failures, or safety hazards. Hence, strengthening the coaxial cable quality inspection p...
Ever nervously plugged in your e-scooter charger on a damp day, hoping rain doesn’t sneak into the connection? Or worried about corrosion wrecking your precious charger’s plug? That tiny connector between your charger cable ...
Introduction
MIPI interfaces—MIPI DSIfor displays and MIPI CSI‑2for cameras—are now the default high‑speed, low‑power links in mobile, embedded, and automotive vision. Designers often encounter the term 90Ω micro coaxial cablewhen ro...
High-flex micro-coaxial cables are critical components in applications requiring repeated bending, such as robotics, medical devices, and wearable electronics. However, improper handling of bend radius limits can lead to premature cable...
Is your medical device innovation relying on micro-coaxial cable for critical signal transmission? Whether it’s delivering life-saving data in a pacemaker, enabling precise imaging in endoscopic cameras, or powering diagnostics, e...
Crimping micro coaxial connectors (like MMCX, MCX, or SMP) is essential for reliable signals in devices such as Wi-Fi routers, drones, GPS units, and smartphones. Proper crimping ensures strong connections without signal loss. Follow th...
In the complex landscape of industrial operations, the reliability of connectivity solutions directly impacts productivity, safety, and operational efficiency. Harsh industrial environments—characterized by extreme temperatures, moistur...
When designing cable systems for aircraft, satellites, and spacecraft, engineers often search for information on “high temperature resistant micro coaxial cable for aerospace”. This article explains what these cables are, why they are c...
In the era of wireless connectivity and on-the-go technology, portable devices have become indispensable tools in both professional and personal life. From handheld communication radios and medical monitors to drones, VR headsets, and p...
Tangled cables don’t just look messy—they can slow you down, create tripping hazards, and even damage equipment over time. Whether you’re setting up a home office, gaming station, or entertainment center, effective cable management is k...
Definition and structure
An EMI shielding micro coaxial cable is a miniaturized coaxial interconnect optimized for high‑speed, high‑integrity signal paths in electrically noisy industrial environments. It comprises a central conducto...
Micro coaxial cables are widely used in high-frequency applications due to their compact size, flexibility, and reliable signal transmission. However, like any electronic component, they are susceptible to failures that can disrupt syst...
When it comes to sourcing coaxial cable assemblies for your project—whether it’s for telecommunications, aerospace, industrial automation, or consumer electronics—one of the most critical questions you’ll ask is: What is the cost per fo...
The global transition toward smart grids is revolutionizing how we generate, distribute, and consume utilities. At the heart of this transformation are Advanced Metering Infrastructure (AMI) systems, commonly known as smart metering sys...
You’re designing the next generation of wearables, cramming more sensors into minimally invasive medical devices, or pushing the limits of high-speed data transfer in tight spaces. You need micro-coaxial cables – cables incredibly...
In high-speed, high-density electronic systems, micro coaxial cableis often the critical link that determines whether your product performs reliably in the field or fails during EMI/EMC testing.
At FRS, we design and manufacture high...
Choosing the right cable for your project can be confusing, especially when faced with terms like “micro coaxial” and “standard coaxial.” While both transmit signals efficiently, they serve very different purpose...
Implantable medical devices (IMDs) represent a revolution in healthcare, restoring function, monitoring vital signs, and saving lives. From pacemakers and neurostimulators to cochlear implants and advanced biosensors, these devices rely...
AbstractMicro-coaxial cables have become indispensable in modern imaging systems, particularly in smartphone cameras and augmented/virtual reality (AR/VR) devices, where high-speed data transfer, space constraints, and signal integrit...
As new consumer electronics and network devices—such as 4K/8K smart TVs, 5G CPE routers, and 4K security cameras—become increasingly prevalent, many users wonder if their existing coaxial cables or newly purchased ones can work seamless...
1. Introduction to Micro-Coaxial Cables
1.1 What Are Micro-Coaxial Cables?
Micro-coaxial cables are compact, high-frequency transmission lines designed for precision signal delivery in space-constrained environments. Comprising a ...
In the complex and demanding landscapes of industrial environments, high – temperature coaxial cables have emerged as an indispensable component. These cables are engineered to withstand extreme heat, ensuring reliable signal tran...
In the vast expanse of the ocean, reliable communication is the lifeline for marine and offshore operations. Whether it’s for ship navigation, offshore drilling platforms, or marine research vessels, seamless data transfer and cle...
Understand Your ApplicationThe first step in choosing a coaxial cable is identifying its primary purpose:
TV/Antenna Signals: RG6 cables are ideal for satellite TV, cable TV, and digital antennas due to their high shielding an...
Radar Systems: Precision Signal TransmissionA. Phased Array AntennasSemi-rigid cables are widely used in military and aerospace radar arrays due to their ability to maintain consistent phase relationships across thousands of elemen...
You push your gaming console hard. Demanding games, fast frame rates, stunning visuals – it all demands immense power, delivered with extreme precision. Hidden deep within your PlayStation, Xbox, or other advanced console lies the unsun...
Electric Vehicle (EV) charging stations are becoming as common as gas stations, enabling drivers to power up quickly and conveniently. Behind the sleek charging units and user interfaces lies critical technology, and one unsung hero is ...
As 5G networks continue to expand globally, the demand for reliable, high-performance Distributed Antenna Systems (DAS) has never been greater. DAS plays a critical role in extending 5G coverage, improving signal quality, and supporting...
In the rapidly evolving landscape of advanced electronics, the demand for high-performance connectivity solutions has never been greater. Among the key components driving this demand, Micro-Coaxial Cables stand out as critical enablers,...
When it comes to data transmission, coaxial cables and fiber optics are two common options, but they have significant differences. Understanding these differences can help you choose the right one for your needs.
Transmission Medium
...
Introduction
Particle accelerators, the giant “microscopes” used in physics research and medical applications, rely on an unsung hero: micro-coaxial cables. These specialized cables, often thinner than a pencil lead, form...
Micro-coaxial cables are the unsung heroes of our connected world. Packed into everything from cutting-edge smartphones and laptops to life-saving medical devices and high-frequency aerospace systems, they carry vital signals that power...
OverviewMicro-Coax for HD Video is a cutting-edge coaxial cable engineered to deliver uncompromised high-definition video quality across professional and industrial applications. Designed for reliability, precision, and versatility,.
Meta Description: Discover the advanced features and benefits of Industrial Micro-Coaxial Wiring—engineered for precision, durability, and high-speed signal transmission in industrial environments.
What is Industrial Micro-Co.
Contact Us Micro Coaxial Cable factory-(FRS).
Feel free to reach out to us for any inquiries or orders